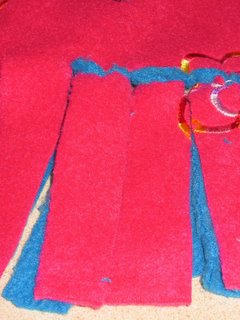
I used one yard each of the printed fleece and the contrasting solid fleece. This made a blanket that's a nice size for a stroller or crib. Lay the printed fleece right side up on the solid fleece and trim all the edges so they are straight and even. Cut a square through both fabrics from each corner the same size as you would like the trim. I made a 6" square from cardstock and used that as a guide for each corner. Once you have the corners cut out, cut the edges into even strips (I did mine 1.5" wide). Now your blanket should look like the diagram below.


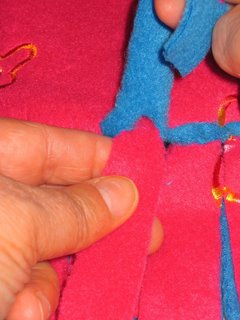
 To "tie" the strips, make a small slit (about 1/4") with a seam ripper through both fabric layers ending slightly above end of strip cut.
Lift the top layer up...
 and feed it through the bottom layer through the slit you just cut.
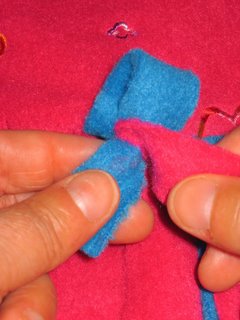
 Once you feed the top layer all the way through, pull the bottom layer up so you can find the slit...
  and then feed the bottom layer through the slit...
 pulling it tight to make the edge border.
 That's all there is to it. Although it's a lot of steps to show with photos, it's actually super easy to do. If you try it and get stuck or if you have any question, just e-mail me.


16 comments:
Donna,
Thank you for showing how to do this! I will be making seven more of these for X-Mas gifts for all my neices and nephews, except I bought two yards for each blanket so it can fit on twin beds. I hope I can follow directions;) it looks simply enough so even I can do! I guess maybe I should try one before I say its simply.
Thanks again for doing this
Kimberly Evans
I Love it Donna!!! I am going to give it a try thanks for sharing.
Susan R
P.S. Nice Manicure :)
Thanks for posting the directions. I'll be making a blanket soon and I'm going to follow your directions.
Thank you so mucn for posting the directions. I've seen several of these around and have always wondered how they're made. I think I might have to try it! :)
Thanks for that, I am definately going to try it. I have whole bin full of polar fleece that I have never used. I think I am going to make a bunch of little baby blankies with it and use your tips.
That is so clever, can't wait to try it out.
I will have to give that a try!!!
Lisa
Thanks for sharing! I will have to venture a try on that.
Keep smilin!
Thank you for posting this I'm going to make these blankets for my 4 little daycare girls! What fun!
Hannah made a bunch of these after Hurricane Katrina. They sent them to families from the damaged areas.
So were you so surprised that Stephe was your Pal? Wasn't that too cool!!!!
Oh my, I just had the craziest dream that I was practicing how to do the fringe on my girls heads and making these little pony tails on them (just like in your directions) THIS LONG WAIT IS GETTING TO ME! LOL! Maybe I should just press delete and no one would ever know about the dream. I will say that they were the cutest pony tails and I remember being so proud of them! Enough...Enough!!!!
Kimberly Evans
Kimberly,
I think the wait REALLY is getting to you!! ;)
Believe me, I CAN relate though.
Donna :)
I can't wait to try this. I have seen these before where they just tie the strips together, but this looks so much nicer! I will do a practice one for myself then if it turns out ok then I will do more for gifts. Thanks for the instructions and pictures!!
Rhonda in Ohio
Very nice! Can't be that hard- I might just have to give it a try.....
OK my crafty little genius friend -I was so inspired by your post that I raced to Joann's to get fabric for 3 blankets! One for me, one for my pregnant friend Jenni and one for my Secret Pal that hasn't even ben assigned to me yet! Hee! Hee! Can't wait to try this - thanks for the inspiration!
Donna,
No weird dreams last night! I just couldn't sleep. This wait has had me so ANXIOUS just wondering if we will be included or not this time around. I woke up to the offical posting on the CCAA site we just made the cutoff!
WhoooHoooo
Kimberly Evans
Post a Comment